Pages

Showing posts with label Troubleshooting. Show all posts

“Outlook not responding" error or Outlook freezes when you open a file or send mail


When you open a file or send an email message in Microsoft Outlook 2010 or later versions, Outlook freezes, or you receive the following error message: “Outlook not responding”

1.    Go to Start -> Run. Type Outlook.exe /safe, and then click OK.
2.    If the problem is resolved, click Options on the File menu, and then click Add-Ins.
3.    Select COM Add-ins, and then click Go. 
4.    Clear all the check boxes in the list, and then click OK

Steps To Fix All Windows update Error Codes

Before working on your computer, or making any changes on it. Be sure to create a system restore first. System restore feature for Windows will allow you to rollback your systems status from the time you set, or made changes from the computer.

Windows update fail
Windows update error

First you need to check the Windows update services if they are running.

To check for Windows update services, select the start button and type on the search box "services". Or you can go to run and type "services.msc". Either the two, it will open up the Windows services menu.

Next, look for the BITS, Windows Update, and Cryptographic. All these services should be set to automatic. If for some reason there's a component that's currently in disable status, them just right click on it and click automatic.

After finding these services, restart them all by doing a right click on the services icon and select restart.

Another thing is deleting temporary and junk files on the Windows update folder. 

To do that, go to Computer -> C drive -> Windows Folder -> Software distribution folder -> data store -> delete all files in this folder, also delete all the files in the downloads folder.

Go to Microsoft website and search for "Windows Update Agent" or simply click this link Microsoft Windows Update. Make sure you have the latest Windows update agent. If not download the latest Windows update agent, and make sure you download the either 32 or 64 bit depending on your computer.

Lastly, download the Microsoft fixit tools by going to http://microsoft.com/ and look for the Windows update fixit tool.


I used to work for Microsoft Answerdesk for more than 3 years, and these methods never fails. If it does, comment below. If everything else fails go ahead and run perform repair installation, or  if you want to start all over again, perform Windows clean installation.

Tags
windows update stuck, windows update failed, windows update cleanup, windows update always fails, windows update automated troubleshooter, windows update cleanup safe to delete, windows update error

Fix for Any Microsoft Windows Update | Troubleshooting Windows Update Error

Before working on your computer, or making any changes on it. Be sure to create a system restore first. System restore feature for Windows will allow you to rollback your systems status from the time you set, or made changes from the computer.

This troubleshooting is applicable for Windows Vista, 7, 8, 8.1, and 10.

Before anything, your computer should be clean and free from viruses which may hide or corrupt Windows operating system components. If you're not sure if your computer is clean, go to this link The most effective Virus removal method.

First you need to check the Windows update services if they are running.

To check for Windows update services, select the start button and type on the search box "services". Or you can go to run and type "services.msc". Either the two, it will open up the Windows services menu.

Windows Update fails to install


Next, look for the BITS, Windows Update, and Cryptographic. All these services should be set to automatic. If for some reason there's a component that's currently in disable status, them just right click on it and click automatic.

After finding these services, restart them all by doing a right click on the services icon and select restart.

Another thing is deleting temporary and junk files on the Windows update folder. 

To do that, go to Computer -> C drive -> Windows Folder -> Software distribution folder -> data store -> delete all files in this folder, also delete all the files in the downloads folder.

Go to Microsoft website and search for "Windows Update Agent" or simply click this link Microsoft Windows Update. Make sure you have the latest Windows update agent. If not download the latest Windows update agent, and make sure you download the either 32 or 64 bit depending on your computer.

Lastly, download the Microsoft fixit tools by going to http://microsoft.com/ and look for the Windows update fixit tool.

I used to work for Microsoft Answerdesk for more than 3 years, and these methods never fails. If it does, comment below. If everything else fails go ahead and run perform repair installation, or  if you want to start all over again, perform Windows clean installation.

Tags
windows update stuck, windows update failed, windows update cleanup, windows update always fails, windows update automated troubleshooter, windows update cleanup safe to delete, windows update error

Lexmark Printers not pulling out paper from the tray 1

I have been getting a lot of calls lately regarding issues with Lexmark printers not pulling out paper from the tray. According to customers when they start to print, the printer will not recognize that there's a paper in the tray. Most of the time, it would give error message "load tray 1 with plain paper letter". When we checked the paper menu settings, everything seems to be correct. The paper type is set to plain paper and the size is letter. So what could be causing this issue?

If you go to the technical side, the most probable cause would be the pick arm assembly and the acm clutch. It is the part located under the printer where the tray is. By the way, this applies to all Color and Mono Printers;

For Mono Printers 
Lexmark E260, Lexmark E360, Lexmark E460, Lexmark MS31x, Lexmark MS41x, Lexmark MS510, Lexmark MX310, Lexmark MX410, Lexmark MX51x, Lexmark MX61x, Lexmark MS310, Lexmark MS315, Lexmark MS415, Lexmark M1140, Lexmark MS510, Lexmark MS610, Lexmark MX310, Lexmark MX410, Lexmark MX5x, Lexmark MX610, Lexmark MX611, Lexmark X203, Lexmark X204, Lexmark X464, Lexmark X264, Lexmark X363, Lexmark X364

For Color printers
Lexmark CX74, Lexmark X548, Lexmakr C52x, Lexmark C73, Lexmark C74, Lexmark C540, Lexmark C543, Lexmark C544. Lexmark C546, Lexmark CS310, Lexmark CS410, Lexmark CS510, Lexmark X54, Lexmark X73x, Lexmark X548, Lexmark X560, Lexmark X746, Lexmark X748

Now here's the quick fix! Don't be surprise.

Remove the standard tray, and locate the pick tires or rubber tires underneath the printer where the tray is located. Just remove the white rubber tires, they're stretchable so just move it to the side. Wash it with clean water and soap. Dry it well, then put it back on. Put the tray back in, and make a test print. 95 percent of the time, this trick works. 


Lexmark Pick Arm Assembly

That's it. If you have additional question or concern please leave a comment below.

Tag:

Lexmark printer not recognizing paper from the tray, Lexmark printer won't pick paper, Getting paper jam error, lexmark paper not feeding into printer, lexmark printer does not feed paper, lexmark printer not feeding paper, lexmark printer not feeding paper correctly, lexmark x4550 printer not feeding paper, lexmark x4650 printer not feeding paper, lexmark x5470 printer will not feed paper

Configuring a POP3 e-mail account with Mail App in Windows 8.1

As you know the Mail app that is included with Windows 8.1 does not support POP3 accounts. 

The following is the workaround by using Outlook.com.

With Outlook.com, you can link an existing POP account to your Microsoft Account.

Here are the steps:

1. Log into Outlook.com with your Microsoft Account 

2. At the top right, click on the setting icon


3. Select “More Mail Settings”. This will bring up the inbox option 

4. Select “Sending/Receiving mail from other accounts”


5. You will then see a page where you can add the details of the account. Make sure you click on “Advanced options”. This will provide you the field boxes for the POP configuration.


6. Configure your Windows 8.1 with the same Microsoft account that you used to log into Outlook.com (if it has not been done yet). 7. You should also consider changing the “Reply-to address” if you want to use the same address from the POP account. By default, Outlook.com will use the Microsoft Account address. This configuration can also be set on the “More Mail Settings” page.

Known issue regarding this solution

When replying to a message delivered to the POP3 address, the message will be sent from the Outlook.com account, not the POP account and may include a “on behalf of header” Example: From ABC@123.com on behalf of MY.POP3@account.com

The Mail app is only able to send from the account that it has the settings for. So when I reply to a POP3 message with my Outlook.com account via the Mail app, the messages is sent from the Outlook.com account and not the POP3 account and there is no on behalf of header. While there is an option to change the account in which you are sending from, there is not an option to select your POP account from the Mail app.

Possible reasons why Windows Update Failed to Install

Here are the possible error codes you will encounter in Windows operating system. Most of this error are very common, and usually appear during the first time you install the Windows update on the computer. Possible solution links above, and below this post.

Error codes that the Component Based Servicing (CBS) interface methods return

0xf0801 CBS_S_BUSY operation is still in progress
0xf0802 CBS_S_ALREADY_EXISTS source already exists, now copy not added
0xf0803 CBS_S_STACK_SHUTDOWN_REQUIRED servicing stack updated, aborting
0xf0800 CBS_E_INTERNAL_ERROR Reserved error (|); there is no message for this error
0xf0801 CBS_E_NOT_INITIALIZED session not initialized
0xf0802 CBS_E_ALREADY_INITIALIZED session already initialized
0xf0803 CBS_E_INVALID_PARAMETER invalid method argument
0xf0804CBS_E_OPEN_FAILED the update could not be found or could not be opened
0xf0805CBS_E_INVALID_PACKAGE the update package was not a valid CSI update
0xf0806CBS_E_PENDING the operation could not be complete due to locked resources
0xf0807 CBS_E_NOT_INSTALLABLE the component referenced is not separately installable
0xf0808 CBS_E_IMAGE_NOT_ACCESSIBLE the image location specified could not be accessed
0xf0809 CBS_E_ARRAY_ELEMENT_MISSING attempt to get non-existent array element
0xf080A CBS_E_REESTABLISH_SESSION session object updated, must recreate session
0xf080B CBS_E_PROPERTY_NOT_AVAILABLE requested property is not supported
0xf080C CBS_E_UNKNOWN_UPDATE named update not present in package
0xf080D CBS_E_MANIFEST_INVALID_ITEM invalid attribute or element name encountered
0xf080E CBS_E_MANIFEST_VALIDATION_DUPLICATE_ATTRIBUTES multiple attributes have the same name
0xf080F CBS_E_MANIFEST_VALIDATION_DUPLICATE_ELEMENT multiple elements have the same name
0xf0810 CBS_E_MANIFEST_VALIDATION_MISSING_REQUIRED_ATTRIBUTES required attributes are missing
0xf0811 CBS_E_MANIFEST_VALIDATION_MISSING_REQUIRED_ELEMENTS required attributes are missing
0xf0812 CBS_E_MANIFEST_VALIDATION_UPDATES_PARENT_MISSING required attributes are missing
0xf0813 CBS_E_INVALID_INSTALL_STATE install state value not acceptable
0xf0814 CBS_E_INVALID_CONFIG_VALUE invalid setting configuration value
0xf0815 CBS_E_INVALID_CARDINALITY invalid cardinality
0xf0816 CBS_E_DPX_JOB_STATE_SAVED job state for DPX has been saved
0xf0817 CBS_E_PACKAGE_DELETED package was uninstalled and is no longer accessible
0xf0818 CBS_E_IDENTITY_MISMATCH container package points to a package manifest whose identity doesn't match the identity specified
0xf0819CBS_E_DUPLICATE_UPDATENAME update name is duplicated in package.
0xf081A CBS_E_INVALID_DRIVER_OPERATION_KEY the driver operations key is corrupt or invalid
0xf081B CBS_E_UNEXPECTED_PROCESSOR_ARCHITECTURE the processor architecture specified is not supported
0xf081C CBS_E_EXCESSIVE_EVALUATION Watchlist: not able to reach steady state after too many attempts.
0xf081D CBS_E_CYCLE_EVALUATION Watchlist: cycle appears when planning component intended state.
0xf081E CBS_E_NOT_APPLICABLE the package is not applicable
0xf081F CBS_E_SOURCE_MISSING source for package or file not found, ResolveSource() unsuccessful
0xf0820 CBS_E_CANCEL user cancel, IDCANCEL returned by ICbsUIHandler method except Error()
0xf0821 CBS_E_ABORT client abort, IDABORT returned by ICbsUIHandler method except Error()
0xf0822 CBS_E_ILLEGAL_COMPONENT_UPDATE Component update without specifying <updateComponent> in package manifest.
0xf0823 CBS_E_NEW_SERVICING_STACK_REQUIRED Package needs a newer version of the servicing stack.
0xf0824 CBS_E_SOURCE_NOT_IN_LIST Package source not in list.
0xf0825 CBS_E_CANNOT_UNINSTALL Package cannot be uninstalled.
0xf0826 CBS_E_PENDING_VICTIM Package failed to install because another pended package failed.
0xf0827 CBS_E_STACK_SHUTDOWN_REQUIRED servicing stack updated, aborting
0xf0900 CBS_E_XML_PARSER_FAILURE unexpected internal XML parser error.
0xf0901 CBS_E_MANIFEST_VALIDATION_MULTIPLE_UPDATE_COMPONENT_ON_SAME_FAMILY_NOT_ALLOWED In a given package, only one <updateComponent> Is allowed for a component family.

Windows Update failed to Install, Windos Update Error, Unable to install Windows update, Windows update does not install automatically, Windows Update  failed, Failed to Install Windows Update, Windows update does not start automatically, Windows Update error, How to fix Windows update, Windows Update failed to initialize, Windows Update won't start, How to disable Windows update, Windows update service pack error

Windows Update success codes

0x80240001 WU_E_NO_SERVICE Windows Update Agent was unable to provide the service.
0x80240002 WU_E_MAX_CAPACITY_REACHED The maximum capacity of the service was exceeded.
0x80240003 WU_E_UNKNOWN_ID An ID cannot be found.
0x80240004 WU_E_NOT_INITIALIZED The object could not be initialized.
0x80240005 WU_E_RANGEOVERLAP The update handler requested a byte range overlapping a previously requested range.
0x80240006 WU_E_TOOMANYRANGES The requested number of byte ranges exceeds the maximum number (2^31 - 1).
0x80240007 WU_E_INVALIDINDEX The index to a collection was invalid.
0x80240008 WU_E_ITEMNOTFOUND The key for the item queried could not be found.
0x80240009 WU_E_OPERATIONINPROGRESS Another conflicting operation was in progress. Some operations such as installation cannot be performed twice simultaneously.
0x8024000A WU_E_COULDNOTCANCEL Cancellation of the operation was not allowed.
0x8024000B WU_E_CALL_CANCELLED Operation was cancelled.
0x8024000C WU_E_NOOP No operation was required.
0x8024000D WU_E_XML_MISSINGDATA Windows Update Agent could not find required information in the update's XML data.
0x8024000E WU_E_XML_INVALID Windows Update Agent found invalid information in the update's XML data.
0x8024000F WU_E_CYCLE_DETECTED Circular update relationships were detected in the metadata.
0x80240010 WU_E_TOO_DEEP_RELATION Update relationships too deep to evaluate were evaluated.
0x80240011 WU_E_INVALID_RELATIONSHIP An invalid update relationship was detected.
0x80240012 WU_E_REG_VALUE_INVALID An invalid registry value was read.
0x80240013 WU_E_DUPLICATE_ITEM Operation tried to add a duplicate item to a list.
0x80240016 WU_E_INSTALL_NOT_ALLOWED Operation tried to install while another installation was in progress or the system was pending a mandatory restart.
0x80240017 WU_E_NOT_APPLICABLE Operation was not performed because there are no applicable updates.
0x80240018 WU_E_NO_USERTOKEN Operation failed because a required user token is missing.
0x80240019 WU_E_EXCLUSIVE_INSTALL_CONFLICT An exclusive update cannot be installed with other updates at the same time.
0x8024001A WU_E_POLICY_NOT_SET A policy value was not set.
0x8024001B WU_E_SELFUPDATE_IN_PROGRESS The operation could not be performed because the Windows Update Agent is self-updating.
0x8024001D WU_E_INVALID_UPDATE An update contains invalid metadata.
0x8024001E WU_E_SERVICE_STOP Operation did not complete because the service or system was being shut down.
0x8024001F WU_E_NO_CONNECTION Operation did not complete because the network connection was unavailable.
0x80240020 WU_E_NO_INTERACTIVE_USER Operation did not complete because there is no logged-on interactive user.
0x80240021 WU_E_TIME_OUT Operation did not complete because it timed out.
0x80240022 WU_E_ALL_UPDATES_FAILED Operation failed for all the updates.
0x80240023 WU_E_EULAS_DECLINED The license terms for all updates were declined.
0x80240024 WU_E_NO_UPDATE There are no updates.
0x80240025 WU_E_USER_ACCESS_DISABLED Group Policy settings prevented access to Windows Update.
0x80240026 WU_E_INVALID_UPDATE_TYPE The type of update is invalid.
0x80240027 WU_E_URL_TOO_LONG The URL exceeded the maximum length.
0x80240028 WU_E_UNINSTALL_NOT_ALLOWED The update could not be uninstalled because the request did not originate from a WSUS server.
0x80240029 WU_E_INVALID_PRODUCT_LICENSE Search may have missed some updates before there is an unlicensed application on the system.
0x8024002A WU_E_MISSING_HANDLER A component required to detect applicable updates was missing.
0x8024002B WU_E_LEGACYSERVER An operation did not complete because it requires a newer version of server.
0x8024002C WU_E_BIN_SOURCE_ABSENT A delta-compressed update could not be installed because it required the source.
0x8024002D WU_E_SOURCE_ABSENT A full-file update could not be installed because it required the source.
0x8024002E WU_E_WU_DISABLED Access to an unmanaged server is not allowed.
0x8024002F WU_E_CALL_CANCELLED_BY_POLICY Operation did not complete because the DisableWindowsUpdateAccess policy was set.
0x80240030 WU_E_INVALID_PROXY_SERVER The format of the proxy list was invalid.
0x80240031 WU_E_INVALID_FILE The file is in the wrong format.
0x80240032 WU_E_INVALID_CRITERIA The search criteria string was invalid.
0x80240033 WU_E_EULA_UNAVAILABLE License terms could not be downloaded.
0x80240034 WU_E_DOWNLOAD_FAILED Update failed to download.
0x80240035 WU_E_UPDATE_NOT_PROCESSED The update was not processed.
0x80240036 WU_E_INVALID_OPERATION The object's current state did not allow the operation.
0x80240037 WU_E_NOT_SUPPORTED The functionality for the operation is not supported.
0x80240038 WU_E_WINHTTP_INVALID_FILE The downloaded file has an unexpected content type.
0x80240039 WU_E_TOO_MANY_RESYNC Agent is asked by server to resync too many times.
0x80240040 WU_E_NO_SERVER_CORE_SUPPORT WUA API method does not run on Server Core installation.
0x80240041 WU_E_SYSPREP_IN_PROGRESS Service is not available while sysprep is running.
0x80240042 WU_E_UNKNOWN_SERVICE The update service is no longer registered with AU.
0x80240FFF WU_E_UNEXPECTED An operation failed due to reasons not covered by another error code.

Windows Installer minor errors

0x80241001 WU_E_MSI_WRONG_VERSION Search may have missed some updates because the Windows Installer is less than version 3.1.
0x80241002 WU_E_MSI_NOT_CONFIGURED Search may have missed some updates because the Windows Installer is not configured.
0x80241003 WU_E_MSP_DISABLED Search may have missed some updates because policy has disabled Windows Installer patching.
0x80241004 WU_E_MSI_WRONG_APP_CONTEXT An update could not be applied because the application is installed per-user.
0x80241FFF WU_E_MSP_UNEXPECTED Search may have missed some updates because there was a failure of the Windows Installer.

Windows update installer minor errors, unable to inialize the Windows update, failed to install windows update, error code for WIndows update

Unable to open docs for MS Office Word 2013 and Office 2010

If you’re having issue with opening Microsoft Office 2013 application, it’s probably caused by add-ons installed and or the document is set to protected mode.

This tutorial will teach you how to troubleshoot issues with Microsoft Office that are unable to launch or open any documents.
1. The first thing you need to do is open any Microsoft application in the computer (Excel,Word, Powerpoint 2013, etc.)
2. Second, on the application that’s opened, let’s say Microsoft Word 2013. On the upper right corner of the window, click on File, then scroll down to Options.
3. The window for Options will pop up; Select “Trust Center” and click “Trust center settings.”
4. Now, look for the “Protected view.”
5. You have to clear all the boxes under protected view. Uncheck all the options under “Protected View” and click OK to apply the changes.
6. You can now close the application and re-open the documents that isn’t opening earlier.
7. Try opening any file now with Microsoft Office application. That issue should be resolved now.
I hope you learned something from this simple tutorial. If you have any question or suggestion, please feel free to comment below.

General Troubleshooting for Office 2013 and Office 365 Installation

This is the general troubleshooting steps for Office 2013, or Office 365. That's usually caused a third party application having conflict with the installation files. Sometimes it will stop or hangs on 87% etc...


Here is the general troubleshooting steps on how to sort it out. I tried this several times with great success. 

Steps:
1.       Perform computer clean boot (disable Non MS Services/Startup) = Visit this Clean Boot Link for the steps.

2.       Create and Login to a new Admin Account = Visit this Create New User Account link for the steps.

3.       Delete temp files. Press windows key + R. On the run box type the following;
                 a.       %temp%
                 b.       C:/Windows/temp
                 c.        C:/Windows/Prefetch

4.       Optimize the Internet Explorer.
                1.        Type inetcpl.cpl on run and click OK
                2.        Under General, click on delete browsing history, put a check on all boxes, and click delete
                3.        Under Security Tab, click on reset all zones to default level
                4.        Under Privacy, click on clear sites
                5.        Under Content, click on clear SSL state
                6.        Under Advanced, click on restore advanced settings, and click on reset, put a check on delete personal settings, and click reset

5.       Run the Office 365 uninstaller fixit http://support.microsoft.com/kb/2739501

6.       Delete Microsoft Office 15 in Program Files and Program Files(x86)

7.       Run IE in private mode;
                  Press control shift + P

8.       Download the 64bit and 32bit Office setup file… login to http://office.com/myaccount

9.       Run first the 64bit. An error may appear regarding integrated... Just click on OK.

10.    Run the 32bit installer.


Can't Create New Folder in Windows 7 | Solved

This issue is caused by a corrupted registry.

To resolve this, we will need to rebuild the registry settings. 


First, is open a notepad and copy the code snippet below. Start with the [HKEY_CLASSES_ROOT\FOder]


Code Snippet


Windows Registry Editor Version 5.00


[HKEY_CLASSES_ROOT\Folder]
@="Folder"
"EditFlags"=hex:d2,03,00,00
"FullDetails"="prop:System.PropGroup.Description;System.ItemNameDisplay;System.ItemType;System.Size"
"ThumbnailCutoff"=dword:00000000
"TileInfo"="prop:System.Title;System.PropGroup.Description;System.ItemType"

[HKEY_CLASSES_ROOT\Folder\DefaultIcon]
@=hex(2):25,00,53,00,79,00,73,00,74,00,65,00,6d,00,52,00,6f,00,6f,00,74,00,25,\
00,5c,00,53,00,79,00,73,00,74,00,65,00,6d,00,33,00,32,00,5c,00,73,00,68,00,\
65,00,6c,00,6c,00,33,00,32,00,2e,00,64,00,6c,00,6c,00,2c,00,33,00,00,00

[HKEY_CLASSES_ROOT\Folder\shell]

[HKEY_CLASSES_ROOT\Folder\shell\explore]
"MultiSelectModel"="Document"
"BrowserFlags"=dword:00000022
"ExplorerFlags"=dword:00000021

[HKEY_CLASSES_ROOT\Folder\shell\explore\command]
@=hex(2):25,00,53,00,79,00,73,00,74,00,65,00,6d,00,52,00,6f,00,6f,00,74,00,25,\
00,5c,00,45,00,78,00,70,00,6c,00,6f,00,72,00,65,00,72,00,2e,00,65,00,78,00,\
65,00,20,00,2f,00,73,00,65,00,70,00,61,00,72,00,61,00,74,00,65,00,2c,00,2f,\
00,65,00,2c,00,2f,00,69,00,64,00,6c,00,69,00,73,00,74,00,2c,00,25,00,49,00,\
2c,00,25,00,4c,00,00,00
"DelegateExecute"="{11dbb47c-a525-400b-9e80-a54615a090c0}"

[HKEY_CLASSES_ROOT\Folder\shell\open]
"MultiSelectModel"="Document"
"BrowserFlags"=dword:00000010
"ExplorerFlags"=dword:00000012

[HKEY_CLASSES_ROOT\Folder\shell\open\command]
@=hex(2):25,00,53,00,79,00,73,00,74,00,65,00,6d,00,52,00,6f,00,6f,00,74,00,25,\
00,5c,00,45,00,78,00,70,00,6c,00,6f,00,72,00,65,00,72,00,2e,00,65,00,78,00,\
65,00,20,00,2f,00,73,00,65,00,70,00,61,00,72,00,61,00,74,00,65,00,2c,00,2f,\
00,69,00,64,00,6c,00,69,00,73,00,74,00,2c,00,25,00,49,00,2c,00,25,00,4c,00,\
00,00
"DelegateExecute"="{11dbb47c-a525-400b-9e80-a54615a090c0}"

[HKEY_CLASSES_ROOT\Folder\shellex]

[HKEY_CLASSES_ROOT\Folder\shellex\ContextMenuHandlers]

[HKEY_CLASSES_ROOT\Folder\shellex\ContextMenuHandlers\BriefcaseMenu]
@="{85BBD920-42A0-1069-A2E4-08002B30309D}"

[HKEY_CLASSES_ROOT\Folder\shellex\ContextMenuHandlers\Offline Files]
@="{474C98EE-CF3D-41f5-80E3-4AAB0AB04301}"

[HKEY_CLASSES_ROOT\Folder\shellex\DragDropHandlers]

[HKEY_CLASSES_ROOT\Folder\shellex\DragDropHandlers\{BD472F60-27FA-11cf-B8B4-444553540000}]
@=""

[HKEY_CLASSES_ROOT\Folder\shellex\PropertySheetHandlers]

[HKEY_CLASSES_ROOT\Folder\shellex\PropertySheetHandlers\BriefcasePage]
@="{85BBD920-42A0-1069-A2E4-08002B30309D}"

[HKEY_CLASSES_ROOT\Folder\shellex\PropertySheetHandlers\Offline Files]
@="{7EFA68C6-086B-43e1-A2D2-55A113531240}"

[HKEY_CLASSES_ROOT\Folder\ShellNew]
"Directory"=""
"IconPath"=hex(2):25,00,53,00,79,00,73,00,74,00,65,00,6d,00,52,00,6f,00,6f,00,\
74,00,25,00,5c,00,73,00,79,00,73,00,74,00,65,00,6d,00,33,00,32,00,5c,00,73,\
00,68,00,65,00,6c,00,6c,00,33,00,32,00,2e,00,64,00,6c,00,6c,00,2c,00,33,00,\
00,00
"ItemName"="@shell32.dll,-30396"
"MenuText"="@shell32.dll,-30317"
"NonLFNFileSpec"="@shell32.dll,-30319"

[HKEY_CLASSES_ROOT\Folder\ShellNew\Config]
"AllDrives"=""
"IsFolder"=""
"NoExtension"=""


Save it as "name.reg" > close notepad > 2xclick on the file name.reg > to the question: Do you want add the information to the windows registry? > OK > restart > must now runs OK!.

Program Won't Uninstall in Windows 7


Just finished working on an installation and uninstallation issue. The problem was regarding the Windows live mail on a virus infected computer.


We can't send and received e-mail because everytime we try to refresh the send and received it gives error message regarding the server configuration.

So we performed all the basic troubleshooting from uninstalling the Windows Essentials, reinstalling, updating, uninstalling again, and re-installing...none of the troubleshootings worked. I even consulted one of the senior tech's but looking at the notes of troubleshooting I did, they suggested to repair install the operating system.


I don't want to do that because it would be a hassle in the customer's end. So what I did is used this fixit tool from Microsoft.


Microsoft Fixit tool for Uninstallation and installation problem

This http://support.microsoft.com/mats/program_install_and_uninstall/en tool will automatically repair issues that block programs from installation or removal due to corrupted registry keys.


I'm not really a fan of Microsoft fixit tool because they rarely work, but for this specific tool. I give it a thumbs up... 

This tool is useful for uninstalling program that doesn't show up on the programs and features in the control panel, or from the root folder of the application itself.


Steps in Resetting Computer Bios Password

What is Bios Password?

Bios password is a specific feature for your computer's mother board. This is specifically helpful if you are running an internet cafe and you don't want anyone to make changes or format your computer. 

Downside

If you forget your BIOS password, then it's over. Specially if your computer won't boot into the operating system. 

How to reset BIOS Password?

There are 2 popular methods of resetting BIOS password. It can be by using a BIOS reset jumper, or taking out the CMOS battery for a few seconds. However, taking out the CMOS battery from  the motherboard would require you to open your computer tower. This might not be the best solution for you specially if you're on a laptop. "So what should I do?" keep reading...

There is of course a way to reset your BIOS password without the hassle of dissecting your computer. The software you need is the "CMOS De-Animator". 

"CMOS De-Animator" software allows you to reset and clear your system's BIOS settings and removing the BIOS Password.  It works by invalidating the checksum of your CMOS memory. It saves you from openning your computer and finding the reset jumper or CMOS battery. 

However, each software has a downside or cons. The downside for this software is you can only use it if you're login to the computer as an Administrator. So if you just got a computer and you don't know the user admin password and BIOS password, then you should keep looking for a different option.

How to use the CMOS-De Animator software? Follow the steps below;

1. Right click on the tool and run it as administrator.
2. Restart the computer.

When the computer starts, you will see a CMOS checksum error and then it will allow you to access the BIOS without a password. 

I cannot post the download link in this blog due to Ad policy so feel free to use our friend google.

Fixit Windows Issue With Uninstall and Reinstalling a Program

Just finished working on a Windows live mail installation issue. The problem was regarding the Windows live mail on a virus infected computer.

We can't send and received e-mail because every time we try to refresh the send and received it gives error message regarding the server configuration.

So we performed all the basic troubleshooting from uninstalling the Windows Essentials, re-installing, updating, uninstalling again, and re-installing...none of the troubleshooting worked. I even consulted one of the senior tech's but looking at the notes of troubleshooting I did, they suggested to repair install the operating system.

I don't want to do that because it would be a hassle in the customer's end. So what I did is used this fixit tool from Microsoft.

This Fix-it Tool tool will automatically repair issues that block programs from installation or removal due to corrupted registry keys.

I'm not really a fan of Microsoft fix-it tool because they rarely work, but for this specific tool. I give it a thumbs up... 

Tags: Windows XP, Windows Vista, Windows 7, Windows 8, and 8.1

Windows 8 Automatically Log on to "Kiosk" or "Other User"

Windows 8 Automaticall Log on to "Kiosk" or "Other User"

There are instances where Windows 8 automatically tries to log on to "Kiosk" or "Other User"‏ and won't allow you to select a specific user account in the computer.

This issue took me a while to get figured out. So here's the fix for that;

1. Log on as Administrator

2. Click start; on the search box type "regedit" without the qoute.

3. Navigate to HKEY_LOCAL_MACHINE > SOFTWARE >Microsoft >Windows NT >CurrentVersion > Winlogon

4. Double click on "AutoAdminLogon" and change the value to 0 (disabled).

5. Restart the computer

Windows 8.1 Apps/PC settings will not Launch [FIXED]

One of the most common issue you might experience after upgrading to Windows 8.1 is the Apps/PC settings will not launch. It will only flickers or will show bluescreen then goes back to the startscreen when you try openning an App from the Startscreen.

If you're experiencing these issue, you may follow the steps below to troubleshoot it. 


Troubleshooting steps:
 
1. Create a new user profile via CMD. First, you need to run the CMD as administrator and type the following;
 
net user /add test 1234
net localgroup administrators test /add
net share concfg*C:\/grant:test,full
 
legend:
test – username
1234 – password
 
Note: you can opt not to put a password, It’s up to you. Also make sure that the new user profile is an ADMINISTRATOR.
 
2. If you're signed in to a Microsoft Account you can sign out and sign in to the new user profile
 
3. Once logged in to the new profile you can delete your original user account(corrupted profile). MAKE SURE to select “KEEP FILES” when deleting the user profile, and then connect your Microsoft Account to the newly created user profile.
 
4. If you are logged in to a Local Account you can migrate the Corrupted user profile to the newly created user profile. http://windows.microsoft.com/en-us/windows/fix-corrupted-user-profile#1TC=windows-7
 
That's it!

How to Disable Automatic Scan and Fix for removable drives in Windows

Disable Automatic Scan and Fix for removable drives in Windows

Usually this message will appear when you insert flashdrive or external drive to your computer.

You will get this message when Windows detects error in the filesystem of the drive, or not properly mounted.

To get this fix, make sure you always use the safely remove options of the drive before you unplug it from the computer. However, if this will continue to happen, you can manually disable this services on your computer so it won't prompt you again with this "automatic scan or fix files" message.

To disable this service, you have to be using the administrator account of your computer. Now, follow these steps;

1.  Press the "Windows key" + "R" to open the run box.
2. Type "msconfig" to open the windows configuration.
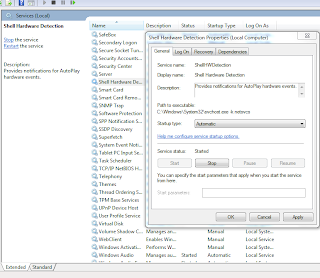
3. Go to the "Services" tab and look for "Shell Hardware Detection". Uncheck it, then click "apply" and "OK". Do not restart the computer yet if it'll prompt you to restart now. Just leave it open.
4. Now go back to the "Run" box and type "services.msc".

Shell Hardware Detection in services.msc

5. Look for "Shell Hardware Detection" and disable it by right clicking on it, and select properties. If the service status is Started, stop it and click apply and ok...
6. Go back to the Window where it ask you to restart the computer, or you can manually restart the computer now.

Once the computer is ready, the automatic scan and fix prompt will stop bothering you now.

Windows 8.1 Update Does Not Appear on the App Store

Update to Windows 8.1 Common issues and fix


There are some computers that are having issues finding the Windows 8.1 update from Windows 8 or Windows 8 pro. If you're having this issue, follow the troubleshooting below;

1. Install KB2871389 if it's not yet installed.

2. Make sure that you're using a retail copy of Windows 8 and not Volume License, Enterprise Edition, or Preview version of Windows 8/8.1.

3. Run WSRESET.exe from the command prompt.
             1. Press the "windows key" to get to the startscreen and start typing "cmd"
             2. Right click on it and select "run as administrator".
             3. On the command prompt type "wsreset.exe"

4. Make sure that the App License is sync to your account
            1. On the start screen, tap/click on the Store App
            2. Point and swipe your mouse from the right edge of the screen and click "settings", or simply press "windows key" + "c".
            3. Click "App updates"
            4. Click "Sync licenses.

5. Verify if the following services are running; BITS, Windows update, and Cryptographic Services.
           1. Press "windows key" + "R" to open the run box.
            2. Type "Services.msc" to open the system services configuration.
            3. Look for the services and right click on it and click properties. If the status is not set to automatic and started, set it to automatic and start the services.
           
6. Open Internet Explorer, and type the following command in the address bar; ms-windows-store:windowsupgrade


That's it! If you're still having the same issue or if you're getting an error code? Please post it on the comment box, I'll get back to it as soon as I can. Thanks for dropping by.

Windows 7 and Windows 8.1 Dual Boot Setup

Windows 7 and Windows 8.1 Dual Boot Setup


Are you hesitant to upgrade to Windows 8.1 since you've heard that it has a huge adjustment from the good Windows 7? Then you should keep reading.

There is a way to use Windows 8.1 on your system while holding on to your Windows 7. This is possible by setting up a dual-boot system. Having a dual-boot system gives you an option on the startup on which version of Windows would you like the computer to start.

How to configure it? It's easy. Just make sure to follow the instructions.


The first thing we'll need to do is prepare the computer's configuration before proceeding to the actual Windows 8 setup. The first procedure will allow you to switch back and forth between operating systems at will. Note that, this configuration will only work with Windows Vista and Windows 7. If you're using Windows XP or Ubuntu, you can use the software EasyBCD.


1. For safety purposes, please backup your important documents, files, pictures, etc...

1. Go to the start menu and type "backup" Click on backup and restore.

2. Backup your computer.

2. Create at least 16GB (20GB for 64-bit Windows 8.1) Partition.

1. Go to start and type "disk management" and click on "Create and format disk partitions"

        2. Right click on the partion with the largest memory, and click on Shrink Volume from the context menu.

        3. It will tell you how much free space can be squeezed out of the drive in MB. For 32-bit version enter at least 16GB, and if you're using 64-bit enter 20GB then click on the Shrink button. That's it.

3. If you have a Windows 8 disc, then much better. You can install Windows 8, then upgrade it to Windows 8.1, or you can directly install Windows 8.1 preview. If you have 32-bit, then select Windows 8.1 32-bit, or 64-bit. Another tool you need is the Windows 7 USB/DVD Download tool, and a flash drive with at has at least 4GB space.

Create a DVD or bootable USB ISO file using Windows 7 USB/DVD Download tool by click on it and select the Windows 8.1 ISO file you have downloaded. Follow the very easy instructions.

4. Install Windows 8.1 using the bootable USB or DVD you've created in the previous step.

1. Insert the USB drive or DVD, then restart the computer. Press any key while the computer is rebooting so it will start on the Flashdrive or DVD.

2. Select your language and click "Install Now" and type the product key. For example, NTTX3-RV7VB-T7X7F-WQYYY-9Y92F for the preview version. Accept the software license agreeent and select "Custom Install" NOT upgrade.

3. Select the partion you've created in step 2, then click on "Drive Options (advanced)" then format the partition.

4. Select the Unallocated Space again and click Next to proceed with the installation of Windows 8.

The installation may take a couple of minutes. Once its completed, you will have the option to select which version of Windows you would like your computer to start.

Thanks for reading. If you have any clarifications, questions, you can leave a comment below.


Resources:

http://windows.microsoft.com/en-us/windows-8/update-from-preview
http://www.microsoftstore.com/store/msusa/html/pbPage.Help_Win7_usbdvd_dwnTool


http://www.pcmag.com/